Snapshot #1145: Power Pancakes

February 28, 2015. Camas, Washington. Our new Saturday tradition, Power Pancakes. Inspired by Nonnie and her Park City Peacecakes and my mother's cherished ground-wheat pancakes, here is my recipe:
Power Pancakes:
1-1/2 Cups Whole Wheat Flour (I grind the wheat in my KitchenAid Grain Mill Attachment)
1/2 Cup Oat Flour (I grind rolled oats in my KitchenAid Grain Mill Attachment)
1 teaspoon Ground Cinnamon
1 Tablespoon Baking Powder
1 teaspoon Salt
1/2 teaspoon Baking Soda
2 Eggs
2 Cups minus 2 Tablespoons Milk
2 Tablespoons Apple Cider Vinegar
1/4 Cup Melted Coconut Oil
1/4 - 1/2 Cup White or Whole Wheat Flour as desired, for thickening
Yum! Yum! I've started making a double batch and refrigerate the leftovers for weekday mornings.
Snapshot #1081: No-Knead Bread
May 9, 2014. San Jose, California. I'm making this no-knead bread for dinner. It's delicious hot out of the oven. Thanks for the tutorial last week, Tierney!
Snapshot #1065: Thee BEST Apple Pie

April 21, 2014. San Jose, California. Thee best apple pie I've ever made...or ever tasted...yes, I'm biased. Click here for the recipe. I made the following changes:
First, I made my mother-in-law's pie crust--
Combine 2 cups flour and 1/2 teaspoon salt
Combine 1/3 cup cold water and 2/3 cup canola oil by pouring it back and forth between two containers to air-ate and fill with tiny little bubbles
Slowly mix water/oil mixture into flour/salt mixture with a fork until just combined then divide in two equal balls and roll out between two sheets of wax paper
Then, I took 2 bartlett pears and 6 granny smith apples
I peeled, sliced and cored the apples and pears, then sprinkled them with lemon juice (to keep them from browning and give them a little extra flavor) and placed them in the pie crust.
Put the lattice work crust over the lemoned apples & pears.
Prepare the sauce. I used salted butter and added the following ingredients:
An extra tablespoon of flour, totaling 4TB flour, added 1 teaspoon cinnamon, 1/2 teaspoon nutmeg and 1 tsp vanilla (the vanilla goes in at the very end, otherwise it boils off)
Once slightly thickened, I poured the piping hot sauce slowly over the pie and crust
And baked at 350, 45 mins approx. And...Yummm!!!
See My Recipe Below:
Ingredients
1 Recipe pastry for a 9-inch double crust pie
6 Granny Smith apples, peeled, cored and sliced
2 Bartlett pears, peeled, cored and sliced
sprinkle of lemon juice
1/2 cup butter
4 tablespoons flour
1/4 cup water
1/2 cup white sugar
1/2 cup brown sugar
1 teaspoon cinnamon
1/2 teaspoon nutmeg
1 teaspoon vanilla
Directions
1. Place the bottom crust in pie pan. Fill with apples & pears, mounded slightly and sprinkled with lemon juice. Cover with a lattice work crust.
2. Preheat oven to 425 degrees F. Melt the butter in a saucepan. Stir in flour to form a paste. Add water, white sugar, brown sugar, and spices and bring to a boil. Reduce temperature and let simmer. Add vanilla just before pouring over the apples.
3. Gently pour the hot sugar and butter liquid over the crust. Pour slowly so that it does not run off.
4. Bake 15 minutes in the preheated oven. Reduce the temperature to 350 degrees F. Continue baking for 35-45 minutes, until apples are soft.
Let sit for 15 minutes, then serve with vanilla ice cream. Yummm!
Snapshot #779: Most Delicious Carrot Cake

March 6, 2013. Wendell, Idaho. Happy Birthday brother! This carrot cake was extraordinarily delicious. I made several modifications to the online recipe based on the reviews. Vegetables have never tasted so good.
Most Delicious Carrot Cake
Ingredients:
4 eggs
1 cup white sugar
1 cup brown sugar
3 teaspoons vanilla extract
3/4 cups grapeseed oil
1/2 cup applesauce
8 oz. crushed pineapple (juice squeezed out)
1/2 teaspoon salt
2 teaspoons baking soda
2 teaspoons baking powder
3 teaspoons ground cinnamon
1 teaspoon pumpkin pie spice
2 cups all-purpose flour
3 cups grated carrots
Directions:
- Carefully slice cake in half horizontally, spread a layer of vanilla pudding laced with maple flavoring. Reassemble the cake then frost with a cream cheese frosting also laced with maple flavoring.
Snapshot #713: Minestrone Soup

December 4, 2012. San Jose, California. More rain calls for more soup. I thought I'd try out a minestrone recipe today. I made slight modifications to this recipe and didn't add the heavy cream.
Snapshot #649: Gingered Carrot Millet Muffins

August 26, 2012. San Jose, California. Gingered Carrot Millet Muffins. For Real. Check out the recipe here.
Snapshot #510: Vegetables, Beef & Barley Soup

March 6, 2012. San Jose, California. Finding inspiration for the kitchen has been a chore as of late; but this Vegetable-Beef-Barley Soup turned out pretty good. Ingredients include: Barley, Broccoli, Leek, Carrot, Onion, Diced Tomatoes, Zucchini, Beef, Water, Broth, Salt, Pepper, Cumin & Olive Oil.
Snapshot #502: Lemon Tart with Rosemary Crust

February 25, 2012. San Jose, California. I made this fabulous lemon tart this afternoon; SO tasty and I love the use of spelt flour and rosemary in the crust! This is definitely a recipe I will be using again. AND it used five lemons (there is hope for my loaded lemon tree after all.)
Lemon Tart with Rosemary Crust
Recipe taken from: http://www.happyolks.com/guest-post-from-so-good-and-tasty/
Created, photographed, and shared by JACQUI at SO GOOD AND TASTY
for the crust
- 1 1/3 cup spelt flour
- 3 tablespoons cane sugar
- 1 tablespoon fresh rosemary, chopped
- pinch of salt
- 1/3 cup cold butter, cubed
- 1-2 tablespoon ice water
for the filling
- 1 cup plain Greek yogurt
- 1/2 cup cane sugar
- 2 eggs
- 1/2 cup fresh lemon juice
- 1 teaspoon lemon zest
Preheat the oven to 350˚F. Lightly butter a 9-inch tart pan and set aside.
Place the flour, sugar, rosemary, and salt in the bowl of a food processor and pulse a few times. Add the butter and pulse until little pea sized bits start to form. Add in the ice water, starting with just 1 tablespoon. Pulse a few more times, then check the dough to see if it holds together when pressed between your fingers. If not, add the 2nd tablespoon. The dough may still seem crumbly, but as long as it holds together when pressed it will be perfect.
Dump the dough out into the prepared tart pan. Starting from the center, work your way out to the sides by pressing the dough firmly into the pan. Make sure you press it up along the sides evenly. Pierce the bottom with a fork a few times and place in the oven to bake for about 15 minutes. Cool on a wire rack for at least 5 minutes before filling.
Meanwhile prepare the filling. Place the yogurt and sugar in a bowl and whisk until thoroughly combined. Whisk in the eggs, one at a time, then add the lemon juice and zest. Whisk until smooth and everything is evenly combined.
Pour the filling into the crust and bake in the oven for 25-30 minutes or until the center is set and only slightly jiggles when shaken lightly.
Allow to cool completely then place in the fridge to chill for at least 1 hour before serving. Tart can be made the day before and kept covered and chilled in the fridge. Serve with fresh whipped cream if you’d like.
Snapshot #441: Sweet Potato Burritos

December 19, 2011. San Jose, California. I was in a recipe slump last week, so I called my mother-in-law for inspiration. True to character, she sent me away excited once again by the artistry of good food creation. Borrowing her recipe, I served sweet potato burritos for the young women who came to my house on friday night. Several have asked for the recipe, so here it is:
Sweet Potato Burritos
Sweet Potatoes
Salt
1-2 Tablespoons Butter
Cooked Rice (white or brown)
Yellow Corn (fresh, frozen, or canned)
Cheese, grated (I used Monterey Jack)
Flour Tortillas
Cabbage, chopped
Pico de Gallo (diced tomato, white onion, green onion, salt, garlic, cilantro, with lime juice)
Green Salsa
Extra Cheese, grated
Sour Cream
Ground Pepper
First, peel, chop, and boil the sweet potatoes with a little salt until soft. Drain the water and mash the potatoes with the butter; add salt to taste. Lay out a tortilla and fill with several spoonfuls of the mashed sweet potatoes, cooked rice, corn, and grated cheese. Roll like a burrito then place on a bed of cabbage. Garnish with Pico de Gallo, Green Salsa, Extra Cheese, Sour Cream, and a little pepper.
This recipe is highly adaptable. Other recommendations include:
black beans
pomegranate garnish
mango salsa

Snapshot #436: Puffy Eggs

December 13, 2011. San Jose, California. With Shelli here, I made one of my family favorites breakfast...Puffy Eggs. It was my personal favorite growing up, so to this day my siblings call me for the recipe. Here it is for the record:
Puffy Eggs (also known as German Pancakes)
2 Tablespoons Butter
9 Eggs (blended first)
1-1/3 Cup Milk
1-1/3 Cup White Four
1/2 teaspoon Salt
First, preheat the oven to 375, then place the butter in the pan (9x13 or 8x8) in the oven and allow it to melt. The secret to the recipe is next. Blend the 9 eggs in the blender all by themselves...blend it real good. Then add the milk, flour, and salt and blend well again. Pour the egg mixture into the pan in the melted butter and cook for 20 minutes, or until sufficiently puffy.


Snapshot #192: Christmas Granola

December 22, 2010. Orem, Utah. Since we've been married, Dave has been requesting Christmas Granola...we finally did it.
Yes, the Granola is homemade. I've been searching for the perfect recipe for a couple of years now. In the past I have always made it too complicated. I tried to keep it simple this time. Here is the Recipe; a special thanks to Martha Stewart.
Ingredients
Makes 8 cups
* 4 cups old-fashioned oats
* 1/2 cup coarsely chopped almonds
* 1/2 cup coarsely chopped pecans
* 1/2 cup coarsely chopped dried cherries
* 1/2 cup sweetened coconut flakes
* 1/2 teaspoon ground cinnamon
* Pinch of salt
* 1/3 cup vegetable oil
* 1/4 cup honey
* 1/2 cup light brown sugar
* 1 teaspoon vanilla extract
Directions
1. Preheat oven to 325 degrees. In a large bowl, stir together oats, almonds, pecans, cherries, coconut, cinnamon, and salt. Set aside.
2. In a small saucepan, combine oil, honey, and sugar. Bring to a boil and remove from heat. Stir in vanilla. Drizzle syrup over oat mixture; toss with a wooden spoon. Pour granola onto sheet pan and spread evenly. Bake, stirring occasionally, until golden (about 25 minutes). Let granola cool completely on a wire rack. Break it into chunks and store in an airtight container.
_________________________________
Tip: Usually when I bake the granola, I bake it and stir it and bake it and stir it and end up baking it too long and it ends up too crispy for my liking. This time was no different, I over-baked a batch or two. So to try and compensate, I left the remaining granola (about half) out on the counter over night and simply let it dry out. On the following day, I mixed the unbaked granola with the baked granola and voila! It was fabulous.
Next time I'm going to try half-baking the entire batch and see what I think. I'm also going to try 1/2 cup frozen apple juice concentrate, thawed, with only 2 Tablespoons Vegetable Oil. According to Martha Stewart: Because apple juice from frozen concentrate is thicker than bottled apple juice, it makes a better coating for the granola, helping it get crisp in the oven without requiring much oil.
I'll let you know...
Snapshot #185: Homemade Noodles

December 15, 2010. Provo, Utah. I have fond memories of Mother's Homemade Chicken Noodle Soup, so I thought I would try some of my own for dinner tonight. Thanks for the recipe Mom!
Homemade Noodles:
Ingredients
* 1 Cup White Flour
* 1/2 Cup Whole Wheat Flour (I grind my own
wheat using the Kitchenaid Attachment)
* 1/2 teaspoon salt
* 1/2 teaspoon black pepper
* 2 eggs, slightly beaten
Directions
1. Sift together Flour, Salt & Pepper.
2. Pour Eggs into Flour mixture and mix with a fork. Knead several times with wet hands, then place on lightly-floured work surface.
3. Roll out dough as thin as you can get it, then slice into 1/8" thick strips with a knife.
4. Allow homemade noodles to dry out on the counter for approximately 1 Hour while you prepare the Chicken Noddle Soup.
5. Once the soup has been prepared, the homemade noddles are the last thing to put in. Simmer until the noodles are cooked through; approximately 7 minutes.


 And now have some delicious, home-canned peaches for the winter months ahead.
Homemade Noodles:
Ingredients
* 1 Cup White Flour
* 1/2 Cup Whole Wheat Flour (I grind my own
wheat using the Kitchenaid Attachment)
* 1/2 teaspoon salt
* 1/2 teaspoon black pepper
* 2 eggs, slightly beaten
Directions
1. Sift together Flour, Salt & Pepper.
2. Pour Eggs into Flour mixture and mix with a fork. Knead several times with wet hands, then place on lightly-floured work surface.
3. Roll out dough as thin as you can get it, then slice into 1/8" thick strips with a knife.
4. Allow homemade noodles to dry out on the counter for approximately 1 Hour while you prepare the Chicken Noddle Soup.
5. Once the soup has been prepared, the homemade noddles are the last thing to put in. Simmer until the noodles are cooked through; approximately 7 minutes.
Snapshot #97: Corn Chowder

September 14, 2010. Orem, Utah. After a day of job searching, this homemade corn chowder really hit the spot.
Ingredients: 1/2 large onion-finely chopped, 1/4 cup butter, 1-1/2 cups water, corn off of 3 cobs-cooked, 1 large potato-peeled and cut into 1/4 inch cubes, 1 can evaporated milk, salt, pepper, and cumin to taste. Feta Cheese.
Directions: In frying pan, saute onion in butter until tender. In saucepan, combine sauteed onions with water, corn, potatoes, and salt & pepper; bring to a boil, reduce heat, cover and simmer for 15 minutes. Reduce heat to low, stir in evaporated milk, additional salt, pepper, and cumin to taste. Use a potato masher to crush and mix the soup. Simmer for an additional 10 minutes, stirring occasionally. Serve and sprinkle with feta cheese.
Snapshot #30: Fresh Strawberries

July 2, 2010. San Jose, California. Fresh Strawberries might be my all-time favorite snack. There happens to be a local strawberry stand just two blocks from our apartment--they are incredibly more scrumptious than the ones I can get from Costco--and in an effort to consume nothing but Real Food I have been enjoying strawberry slices dipped in freshly-squeezed lemon juice with a dash of salt for dessert. Yum!
Snapshot #22: Peanut Butter Kiss Cookies

June 23, 2010. San Jose, California. Home-made gifts can be some of the best kind.
HERSHEY'S KISSES PEANUT BUTTER BLOSSOMS
+/- 48 Hershey's Kisses
1/2 Cup Butter, Softened
3/4 Cup Creamy Peanut Butter
1/3 Cup Granulated Sugar
1/3 Cup Packed Light Brown Sugar
1 Egg
2 Tablespoons Milk
1 Teaspoon Vanilla Extract
1-1/2 Cups All-Purpose Flour
1 Teaspoon Baking Soda
1/2 Teaspoon Salt
Granulated Sugar
DIRECTIONS:
1. Heat oven to 375 degrees F. Remove wrappers from chocolate kisses.
2. Beat butter and peanut butter in large bowl until well blended. Add 1/3 cup granulated sugar and brown sugar; beat until fluffy. Add egg, milk, and vanilla; beat well. Stir together flour, baking soda and salt; gradually beat into peanut butter mixture.
3. Shape dough into 1-inch balls. Roll in granulated sugar; place on ungreased cookie sheet.
4. Bake 8 minutes. Immediately press a chocolate into center of each cookie; cookie will crack around edges. Remove from cookie sheet to wire rack. Cool completely.
Find this and other delicious recipes at: www.hersheykisses.com
Snapshot #11: Very Healthy, Yet Yummy, Homemade Soup

June 14, 2010. San Jose, California. Chicken broth, yellow onion, green onion, basil, cabbage, tomato, garlic pepper, poultry seasoning, and shrimp (or chicken or beef).
Snapshot #9: I have finally mastered Mom's amazing chocolate chip cookies! (only took me 30 years)

June 13, 2010. San Jose, California. I had to make them, bake them, and take them to a party. The true test of my committment to a diet.
I didn't eat a single one! Nor did I try any of the cookie dough..a true feat! What makes it worse, is that they are still sitting in a plastic container in the cupboard. Dave just doesn't eat cookies very quickly...sigh.
The recipe is as follows:
First Preheat the Oven to 375 degrees.
I slowly pour each ingredient into the KitchenAid in the following order, and let it continue to mix on low speed.
Chocolate Chip Cookies
2 Sticks (1 cup) Softened Butter
3/4 Cup Granulated Sugar
3/4 Cup Packed Brown Sugar
1 tsp. Vanilla Extract
2 Eggs
1 tsp. Salt
1 tsp. Baking Soda
2-1/4 Cups White All-Purpose Flour
3 Cups Semi-Sweet Chocolate Chip Cookies
The real magic comes with the baking. I bake immediately after mixing (no refrigerator time)
Using clean hands, I drop small heaps of cookie dough on ungreased baking sheet; Then Bake for 8 Minutes (Do NOT overbake) Bake just until the center of the cookies no longer glisten (or look wet). Then take them out of the oven and allow them to sit on the baking sheet for an additional 5-10 minutes before removing.
Whole Wheat Bread

June 22, 2010. One of the joys of life.
Although I have enjoyed baking bread for many years, I have always used a combination of Whole Grain Flour with White Flour in order to avoid a dense loaf. My-Oh-My how the world has changed! I was first introduced to Peter Reinhart's Whole Grain Breads about 3 months ago, from a friend's blog http://www.progressivepioneer.com/. Almost immediately I checked out the book from the library, and I have been testing bread recipes ever since--totally addicted to the idea of Whole Grain loafs that act like white flour loafs. And guess what...it really works! So I wanted to pass the good news along...

I highly recommend the book, because I won't be able to explain everything in perfect detail on this blog. And you'll learn all kinds of interesting facts about bread science, the anatomy of a wheat kernel, wild yeast, and enzymes. However, because so many of my friends and family have asked...How Did You Do It? Here's a quick run down...from Wheat to Eat.
I grind my own wheat into flour using the Grain Mill (Stand Mixer) Attachment to the KitchenAid. By far my favorite attachment (ok, my only attachment thus far). Using the Grain Mill, I can either crack the wheat for a delicious breakfast cereal, or in this case, grind it into a fine powder perfect for bread making.

Reinhart's recipe does require that I plan ahead; that's the whole secret behind delayed fermentation. The night before I want to consume a delicious loaf of whole grain bread, I create what's called a Soaker as well as a Biga.
Day 1: The Soaker consists of whole wheat flour, salt, and my delicious homemade yogurt (milk or buttermilk may be used instead)

After mixing the soaker ingredients together, I cover loosely with plastic wrap and leave at room temperature for 12 to 24 hours.

Day 1: The Biga consists of whole wheat flour, instant yeast, and filtered water. Also mixed, covered tightly with plastic wrap, and put into the refrigerator overnight. Then, in the morning removed from the refrigerator approximately 2 hours before mixing the final dough, to take off the chill.

Day 2: I use a metal pastry scraper to chop both the Soaker and the Biga into smaller pieces, ready for use in the final dough

Day 2: The Final Dough consists of the Soaker, the Biga, additional whole wheat flour, salt, instant yeast, honey or agave and unsalted butter, melted

After mixing...

Do a little more kneading...

Then place it in a bowl to rise.


Transfer to lightly floured work surface

Shape the loaf

Transfer to Pan

Let rise again


Finally Bake, using a Steam Pan (optional)

Let cool, before serving....if you can :)


100% Whole Grain Bread Never Tasted, Nor Looked, SOOO Good!
Guatemalan Salsa

My first attempt at canning salsa, and I'm already addicted to the savory dish. I will need to start stocking tortilla chips, something that has never been a regular on my grocery list before now.
A novice salsa canner, I chose to start out small, canning only 8 pint jars. I chose a recipe of Guatemalan descent--perfect to satiate my love for Latin American foods--a love developed while living 18 months in El Salvador at the turn of the millenium.
The key to great salsa is Roma Tomatoes. I bought my Roma's at one of the season's last Farmer's Markets at Thanksgiving Point. Roma's are less watery than other varieties, and therefore yield a thicker, more savory sauce.
The Salsa Recipe is as follows: 10 Roma Tomatoes (whole), 5 Tomatillos (whole), 1-2 Serrano Peppers (whole but w/out stems), 1/2 bunch Cilantro, 3-4 Garlic Cloves, 1 Onion (chopped), Lawry's Seasong Salt, and lime juice
The Tomatillos are optional, they add a slighlty acidic flavor to the salsa.

Serrano Peppers are preferred over Anaheim Peppers because their flavor is stronger, mas fuerte! No worries if you prefer mild salsa, the peppers are stewed whole, taken out before blending, then put back in, one at a time, until desired level of 'Hotness' is achieved. Definately customizable. But don't forget to stew them whole, first.

I placed all the ingredients into a large enamel pot, with 1/4 cup water. Then Boiled for 45 minutes, stirring frequently.

Now that all the vegetables are mushy, I removed the serrano peppers, then blended the mixture into a fine puree of salsa. (I didn't have a hand mixer I could put into the pot, so I used my Hamilton Beach Food Processor; I assume a blender could also be used....but gets very messy and tedious). I added the serrano peppers, one-at-a-time, to taste. Added Lawry's Seasoning Salt, to taste. And finally poured my salsa into pint jars. Once in the jars, I added 1-1/2 Tablespoons of freshly-sqeezed lime juice to each jar.

The secret to juicing a lime is simple. First, roll the lime around on the countertop with lots of pressure from your hand. Second, cut the lime in half. Third, nuke it in the microwave for 5-10 seconds, or until the juice is easily squeezed out.
I capped my jars w/lids and rings, immersed them into the water bath, and boiled for an additional 20 minutes. (the water should be only lukewarm when the jars are immersed, so as not to crack the glass....and don't start timing the 20 minutes until after the water starts to boil)


And....voila! Delicious, Savory, Healthy, Latin-American Salsa for my pantry.
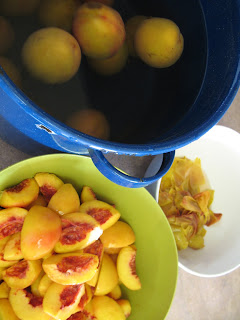
Canning Peaches

Ok, so maybe not millions of peaches, but definitely peaches for free. My adorable and supportive husband spent his entire Saturday afternoon on a ladder, picking all of the peaches from Grandma MariLou's Garden. He was the sole peach picker, because I had abandoned him for a weekend excursion to Idaho (to finish crafting a solid wood headboard in my Dad's shop-of which I will post pictures, later on this week) and his father had also abandoned him (and Grandma for that matter) for an important excursion to Phoenix in celebration of another grandparent's 60th wedding anniversay. Despite my abandonment, Grandma MariLou still gifted us a large bag of home grown peaches. yum, yum.
I found this the perfect opportunity to put some of Mom's Life Lessons into practice, and to Can Peaches on my own for the first time.

First, I scrubbed the peaches clean. Then, on the stove, I started the creation of a honey-water syrup (instead of sugar, because I'm trying to get away from refined sugars)

Blanched the Peaches

Poured them into an Ice-Water Bath

Peeled, then Sliced the Peaches

Poured my Honey Syrup Creation into the Jars


Added the Sliced Peaches

Boiled them in the Hot Water Bath for 40 Minutes

 And now have some delicious, home-canned peaches for the winter months ahead.